Taking Snapshots of your VM and LXC’s is useful but this is no way to backup your data when it comes to recovery scenarios. I discovered the Proxmox Virtual Environment (PVE) in 2023 after moving to the XCP-ng (Xen Cloud Platform – next generation), which is the open-source, community-driven successor and alternative to Citrix XenServer (now rebranded as XenServer). It provides a fully open-source, enterprise-grade virtualization platform based on the Xen Hypervisor, often managed via Xen Orchestra.
The cost of Virtualization
XCP-ng is a great way of avoiding huge costs of VPS services from the likes of Digital Ocean, AWS, a little known company called Impactvps.com and others who are happy to take a minimum of £5 a month for the most basic Virtual Server. When you multiply that by about a dozen Virtual Servers (I typically use one per web-application to avoid losing all if something goes wrong with one of them) and you can see how the costs escalate beyond the budget of any individual who is not necessarily making money from these. Beside, costs rise incrementally for anything decent, such as my NextCloud server which has a deidcated 4 vCPU, 1 Terabyte storage and 32GB RAM !!
The following specification gives you a good idea of recurring costs at one of the cheapest I know, at impactvps.com (at the time of writing this article).
$12/mo
- 4 Cores
- 4GB RAM
- 45GB SSD Disk
- 2000GB Bandwidth
- 5 IPs
The most attractive feature of the above offering is probably the 5 IP addresses included in the plan. I have to admit that the best thing about this and many other such service providers is that they take care of assigning you with an IP address. Although I suspect and it should be verified that these are not Shared IP addresses, their history and whether they’re strictly dedicated for your use. If that is the case, then are you restricted from taking full charge such as switching PHP versions used by your VPS and are you likely to run into issues if you want to establish Mail Servers. IP addresses can end up becoming black-listed and any Mail Services will simply not work if the IP ends up in yet another money making scheme by yet another layer of making life difficult for independents where biggies who have this industry monopolized have integrated checks during e-mail transactions via some form of database that may have black-listed the IP addresses you are assigned. Unlike those that are owned and operated by Google, Microsoft or one of other supposedly ‘free’ Mail Service providers. It is no secret that they issue free mail-services in exchange for information in your e-mails to be scrutinized, harvested and used for whatever purpose they deem useful.
Proxmox is a Game Changer
Coming back to Proxmox, which is a game changer. It is very simple to install and despite a steep learning curve, it is not incredibly difficult to begin experimenting with your own Virtual Machines and Containers in one place.
Once you become familiar with generating Virtual Machines and Containers in the Proxmox Environment, it becomes evident that a reliable Backup Scheme is essential, otherwise you’re as good as an Acrobat in a Circus performing somersaults and jumping from one swing to another 100 feet above ground, without a safety net. It could be game over at any point. That is exactly how I ended up feeling pushed over the edge to embrace Proxmox Backup Server (PBS). I ran a Script on the command line of my PVE when I should have run it inside a VM. Easily done given that the CLI environment or Shell as it is known look pretty much identical. Suddenly… Bang! It was game over. Months of effort and my HomeLab disintegrated before my eyes. There was no way of going back.
I salvaged what I could and rebuilt my Proxmox Hypervisor from scratch. It was never the same again but I have gained a lot of experience and knowledge, so I was able to recover – albeit losing several weeks to establish a similar setup to what I previously had.
In comes PBS. Proxmox folk make installations very simple through the ISO image on pen-drive and boot from Disk method. Installing PBS is identical to installing PVE. Source the latest ISO-image, flash it onto pen-drive using Balena Etcher or Rufus, then boot from USB and you’re on your way to creating your Virtualization environment.
The PBS web-UI is somewhat familiar to those who have used PVE but clearly PBS has a different purpose and so, you need to familiarize yourself with the menus and their purpose. I will go into detail with a supplementary journal to describe step by step how to set it all up but to keep things in perspective, this article is an abstract reference to the need for setting up PVE and PBS so that they can ‘talk’ with one another. The key factor being the concept of Fingerprints, which is a 256-bit 32 Character alphanumeric that comes as part of your TLS generator, in my case LetsEncrypt. Yes, once you ‘secure’ your Hypervisor with an SSL Certificate, a Fingerprint is generated as a bye-product and this needs to be shared with PBS for Backups to become functional.
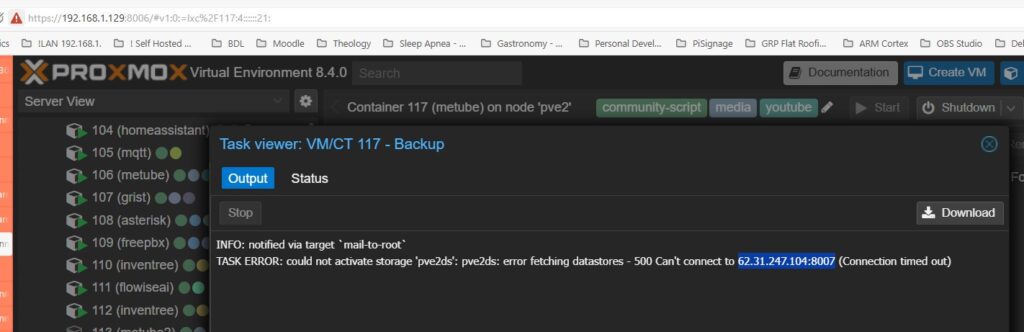
Demystifying Fingerprint mismatch errors
Without a valid Fingerprint pairing, PVE is unable to communicate with PBS and you get the following error messages. Notably, the Fingerprints on each server were identical but somehow became invalid. Next, we go onto taking a good look around the setup (ToDo: I should sketch an abstract view of the two servers, highlighting IP addresses [using DrawIO] to clarify all this!)
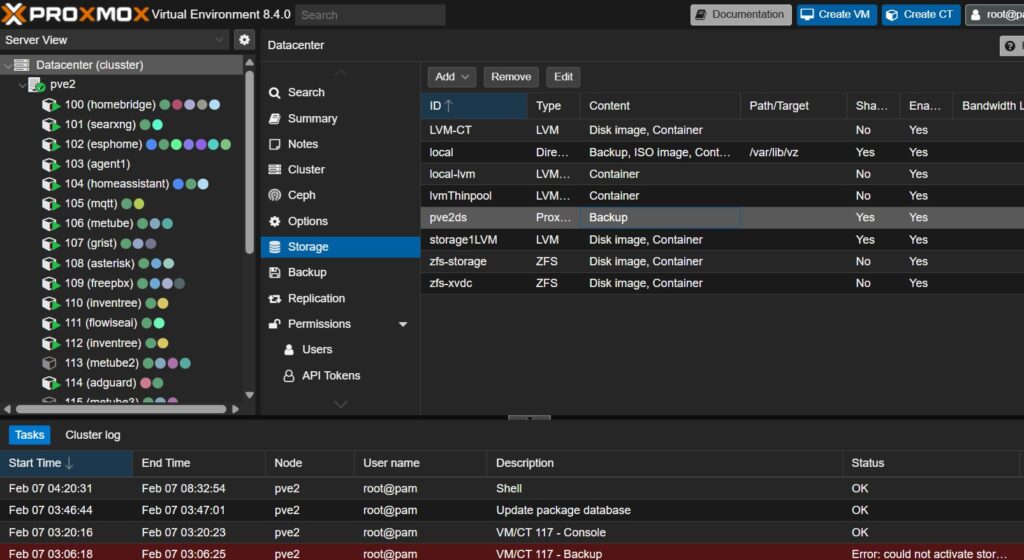
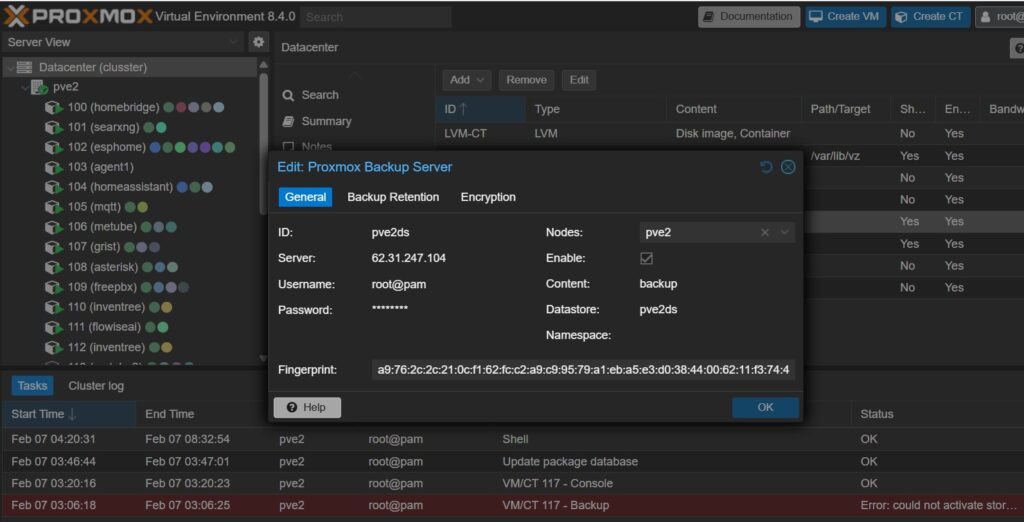
Defining Storage in PVE
PBS Backup Server needs to be defined in the PVE environment. The following images show the attributes needed to tell PVE how to reach PBS including its’ IP address and credentials to access it. You can see that I have added pve2 to the ‘Notes’ field. This is because I am running two PVE’s, and the one based on Proxmox 8.4 is hosted locally on my home LAN with an IP address of 192.168.x.x with PBS running on a dedicated IP address 62.31.247.104
The other crucial piece of information in this setting is the Datastore, which was created inside PBS and named ‘pve2ds’, which tells me that it is the backup storage for my PVE 2 (local) Virtual Machines and Containers – as opposed to those I am hosting and accessible from the WWW.
Backup Jobs
There are numerous different profiles of Backups and the image below shows that I have gone for choosing selective VM/LXC to be backed up. Only these will be backed up and in accordance with the Schedule, twice per week, on Sunday and Thursday at 2:00 am (‘sun, thu 02:00).
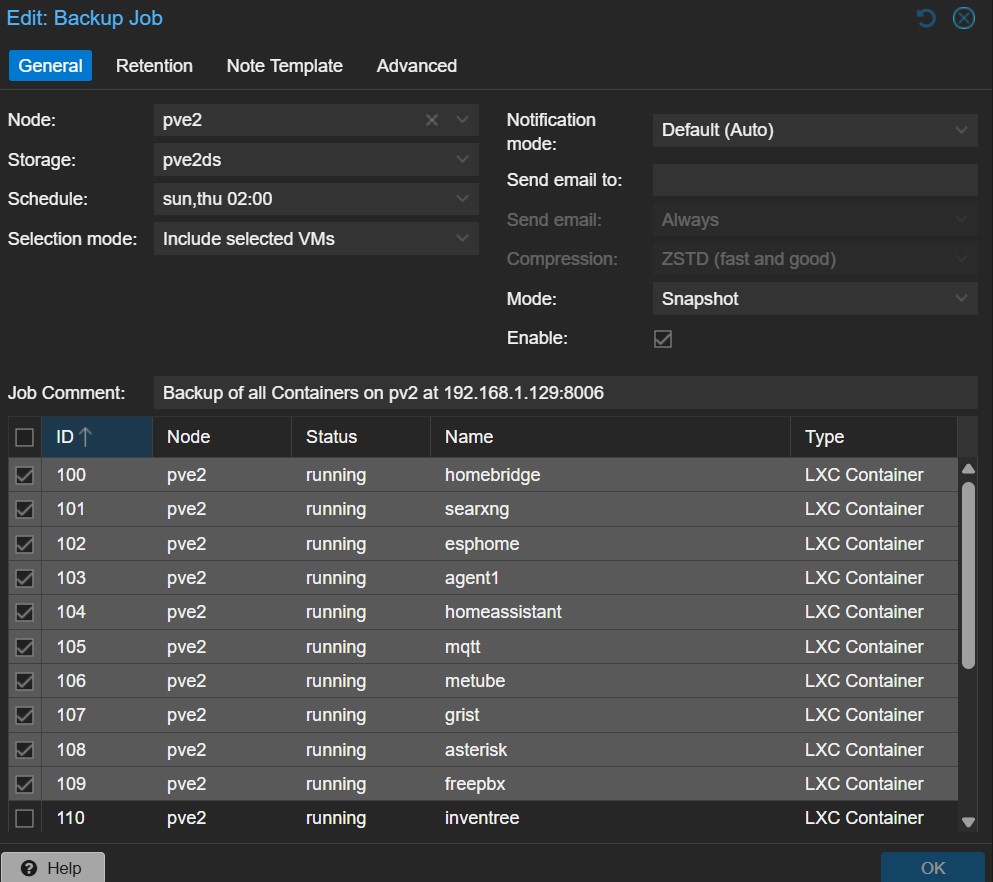
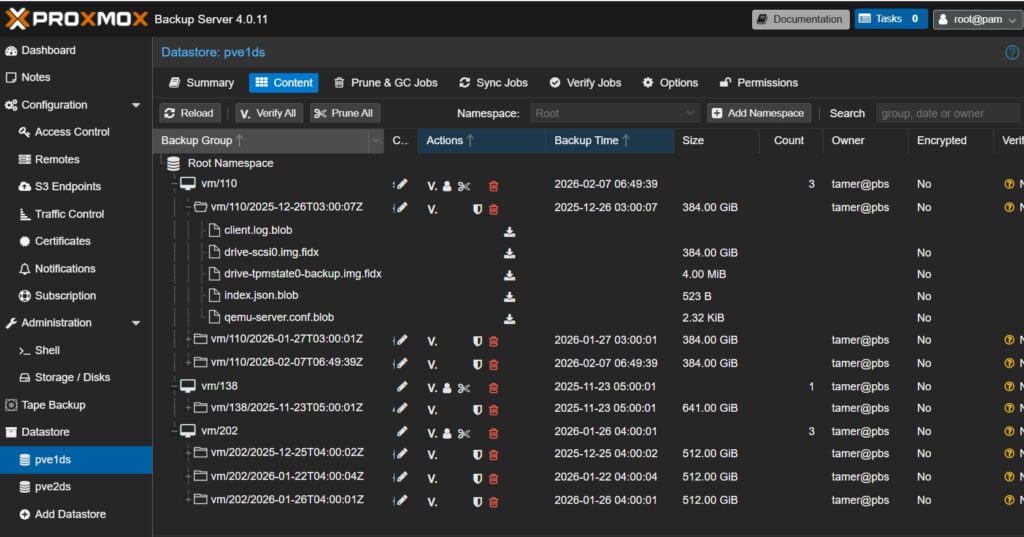
Once we have everything setup correctly, PBS and PVE work together to generated Scheduled Backups, resulting in a bunch of instances as shown below.
Summary
As can be seen, this is no straight forward process and requires considerable appreciation of Networking and configuring two distinct machines, PVE and PBS. The glue that allows the two to work in a perpetual manner includes IP addresses, credentials and FIngerprint, which is acquired indirectly through acquisition of TLS using LetsEncrypt. I appreciate, that probably doesn’t make sense and it is exactly how I felt about all this in the first instance, which is why I avoided it when I first contemplated using PBS for backups before losing my first HomeLab.
Also, you will have noted that images refer to PVE 8.4 even though at the time of writing, PVE 9.01 was available. I actually have two PVE’s running and one is v 8.4 and the other v. 9.01
The reason for this is that some of my VMs / LXCs are spawned from Proxmox VE Helper Scripts which make installation a breeze. Perhaps not very respectable way to go about installing applications but given that this is not a production environment and in context of this being a ‘HomeLab’. And when you are a one man band where the main objective is to learn, familiarize yourself with new technologies and utilize web-applications, then there isn’t really time to go through first principles to install and configure dozens of Virtual Machines and Containers.
I often think about professional and production environments where to achieve what I am describing here, you would probably need about a dozen IT specialists to attain the results we are talking about.
In essence, there are many advantages to having your own HomeLab where you have full control of your destiny as well as understanding just how much control and power you put into the hands of supposedly trustworthy service providers and your own data!