Karl Joch is a prolific author and consultant whose work includes IT infrastructure design, security and Automation. This article refers to one of numerous eBooks published by Karl, specifically on the widely adopted and very functional Home Assistant open-source platform. It represents Karl’s ‘update’ notes on the eBook due to rapid changes on the subject in recent years.
What’s interesting about Karl’s work and publications is that he advocates open-source applications and this aligns with this platform’s values. Notably, the two eBooks referred to in this article are available as Kindle eBooks on Amazon.
Note: All links on this page lead to external web-sites.
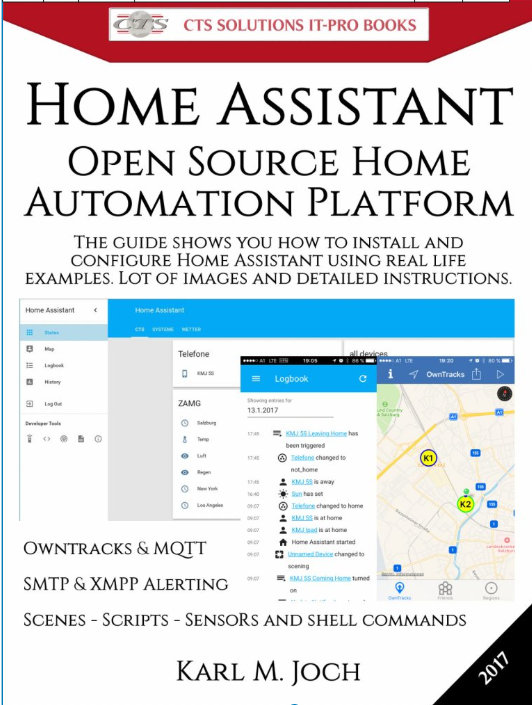
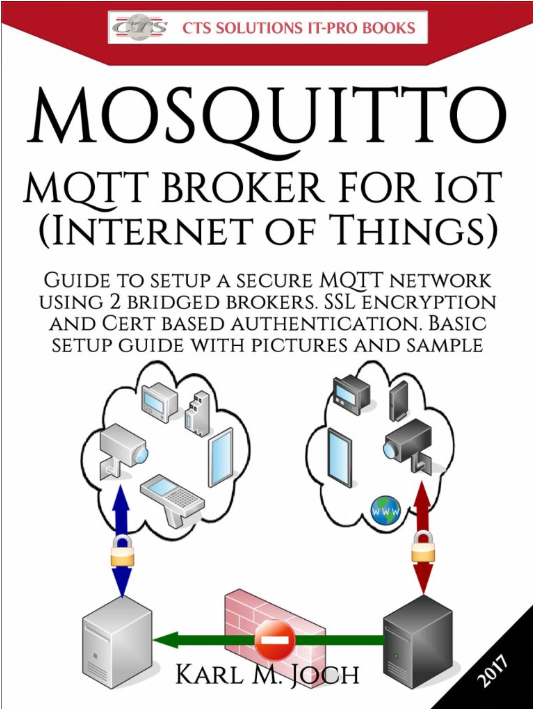
“In 2017 I wrote “Home Assistant – Open Source Home Automation Platform for IoT (Internet of Things) & more” and “Mosquitto – MQTT BROKER FOR IoT (Internet of Things)” which both sold really well and people especially liked the secure MQTT setup. The eBooks are available at DigitalBooks24“
Update 2021:
Since 2017 a lot of Thing happened and I though it is time to get some update out.The servers already was updated to FreeBSD 12.2 and all the installed software was upgraded to the last version. Home Assistant is version 2021.1.5 running on Python 3.7. See the 2021 Update. Not included here!
Update 2023:
Status and Wishlist
I run a fully Home Assistant OS now and moved back to Owntracks which now has a Version running without Google Play Services and things are working perfekt.
There is a German and English Blog entry how to setup things including LIneageOS, Easer, OpenVPN, Linphone and Owntracks on your mobile:
Setup in German | Setup in English
The breaking change was the storm destroying my satellite system on the roof of the house. This brought a lot of things on a new way. First I invested a lot of time in a cool Kodi ( https://kodi.tv/ ) setup to have a TV replacement using streaming channels.
It was pretty hard to have Kodi setup in a way that also older people are able to handle the system and to have a great user experience. The Kodi setup and how it looks like now will be described in a upcoming blog entry here. Meanwhile it is really cool including EPG, TV, Radio, Music from storage, and more. Running one setup virtual on Proxmox, able to connect via spice from a workstation and view on PC and one setup on a Mini-PC connected to my 55″ TV. The setup is in a way the TV set has no Internet access and the Kodi setups run in a DMZ Network, allowed to receive the streams only. Not access to internal network or other dangerous stuff. Furthermore reduces mass surveillance as mus as possible also by mixing streams from different sources, so nobody has a full view on what we do. And for sure no microphone or video in the Mini-PC! Also all Home Assistant hardware is without any mic or cam.
This setup would pretty much fit all enterprise setups where it is required that there is no mic od cam available during meetings! I will never understand people placing a surveillance device (mic an/or cam) within their living room or office. Do people really accept that everybody on the other end of the line to the device is able to listen or watch? If yes, there is need for better IT education for the masses.
The final wishlist looked like this:
- Remote Control for the Kodi Systems in Home Assistant, so we are able to control Kodi from every mobile, tablet or PC
- There was need for temperature and other sensors to see the actual values in different rooms, outdoor and in the server room
- A few devices and lights should be handles by Home Assistant to be able to automate power on and power off. Also the Switches should be controlled with buttons on the dashboard.
- The setup should be based on non proprietary solutions, preferred MQTT
- There should be a motion detector so the cat has kinda door bell when she comes back from her adventures
Video how it looks like now
I prepared a video (without sound till now) to show how things looks like now. It is really nice and things works as expected. Both Kodi systems can be controlled via Home Assistant , also using the Home assistant App from https://FDroid.org Store.
Adding the Kodi Remote Control
The first step was adding the Kodi remote control to Home Assistant. The Kodi Setup has 2 Kodi Instances, both running in a separated Kodi-DMZ VLAN Network, so there is no access to LAN or anything else. Kodi has remote control enabled and there is no access to Kodi from the Internet.
Access to Home Assistant is working through VPN only while being not here. This means there is no 3rd party involved in any part of this setup, except loading the TV streams inside the Kodi instances or downloading the updates and we still have fully access to Home Assistant. Also the VoIP SIP clients are working through VPN, so I have my Asterisk VoIP extension always with me using Linphone on LineageOS (see other blog entries here). Also here, no 3rd party involved except the SIP provider for the +43 phone number. Asterisk is fully restricted in the firewalls too, so no access from the Internet.
What I wanted was an easy to handle remote control with all the features needed, including power on and power off. The final result looks like this for the Kodi Mini-PC Setup:
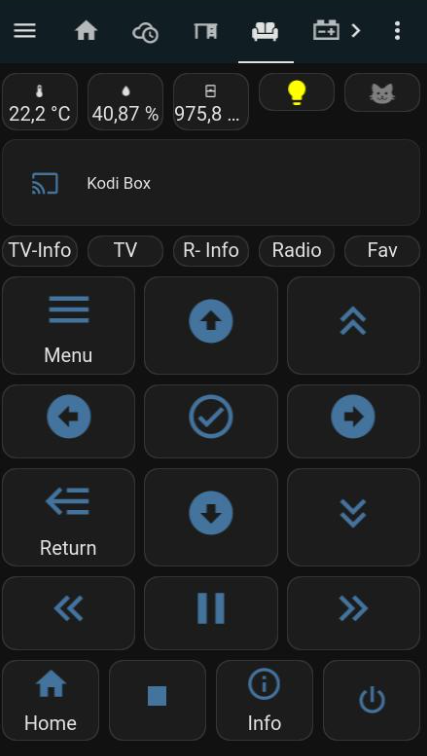
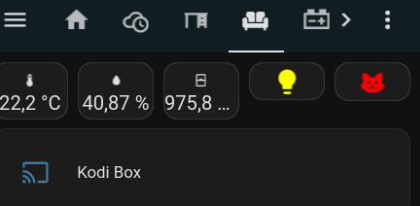
On top of the remote temperature, humidity and pressure of the room are shown. Furthermore there is a button to switch on the light via the IKEA power outlet and the cat alarm is shown there too. Even the Alarm is sent as Message into the Element Matrix Messenger, the cat icon becomes red on alarm on. 🙂
The remote has some special keys to directly jump into the EPG List, or to TV, Radio and Favorites. All other keys are self explaining for a TV remote control.
Finally I am really happy with these remote controls and they are usable also by non-techies without problems. The full code for the remote is:
type: grid
square: true
columns: 1
style: |
  ha-card {
    height: 100%
  }
cards:
  - type: vertical-stack
    cards:
      - type: custom:mini-media-player
        entity: media_player.YOURID
        name: Kodi Box
        power_color: true
        show_state: true
        state_color: true
        hide:
          power: true
        commands:
          turn_off:
            service: automation.kodi_wz_turn_off
      - type: horizontal-stack
        cards:
          - type: button
            name: TV-Info
            size: 30%
            show_icon: false
            show_name: true
            tap_action:
              service: kodi.call_method
              action: call-service
              service_data:
                method: GUI.ActivateWindow
                window: tvguide
                entity_id: media_player.YOURID
            template: remote_button_round
            icon: mdi:menu
          - type: button
            name: TV
            size: 30%
            show_icon: false
            show_name: true
            tap_action:
              service: kodi.call_method
              action: call-service
              service_data:
                method: GUI.ActivateWindow
                window: tvchannels
                entity_id: media_player.YOURID
            template: remote_button_round
            icon: mdi:menu
          - type: button
            name: R- Info
            size: 30%
            show_icon: false
            show_name: true
            tap_action:
              service: kodi.call_method
              action: call-service
              service_data:
                method: GUI.ActivateWindow
                window: radioguide
                entity_id: media_player.YOURID
            template: remote_button_round
            icon: mdi:menu
          - type: button
            name: Radio
            size: 30%
            show_icon: false
            show_name: true
            tap_action:
              service: kodi.call_method
              action: call-service
              service_data:
                method: GUI.ActivateWindow
                window: radiochannels
                entity_id: media_player.YOURID
            template: remote_button_round
            icon: mdi:menu
          - type: button
            name: Fav
            size: 30%
            show_icon: false
            show_name: true
            tap_action:
              service: kodi.call_method
              action: call-service
              service_data:
                method: GUI.ActivateWindow
                window: favourites
                entity_id: media_player.YOURID
            template: remote_button_round
            icon: mdi:menu
      - type: horizontal-stack
        cards:
          - type: button
            name: Menu
            size: 30%
            show_name: true
            tap_action:
              service: kodi.call_method
              action: call-service
              service_data:
                method: Input.ContextMenu
                entity_id: media_player.YOURID
            template: remote_button_round
            icon: mdi:menu
          - type: button
            template: remote_button_round
            hold_action:
              service: kodi.call_method
              action: call-service
              service_data:
                method: Input.Up
                entity_id: media_player.YOURID
              repeat: 100
            icon: mdi:arrow-up-bold-circle
            tap_action:
              service: kodi.call_method
              action: call-service
              service_data:
                method: Input.Up
                entity_id: media_player.YOURID
          - icon: mdi:chevron-double-up
            type: button
            template: remote_button_round
            hold_action:
              service: kodi.call_method
              action: call-service
              service_data:
                method: Input.ExecuteAction
                entity_id: media_player.YOURID
                action: pageup
              repeat: 100
            tap_action:
              service: kodi.call_method
              action: call-service
              service_data:
                method: Input.ExecuteAction
                entity_id: media_player.YOURID
                action: pageup
      - type: horizontal-stack
        cards:
          - icon: mdi:arrow-left-bold-circle
            type: button
            template: remote_button_round
            tap_action:
              service: kodi.call_method
              action: call-service
              service_data:
                method: Input.Left
                entity_id: media_player.YOURID
          - icon: mdi:check-circle-outline
            type: button
            template: remote_button_round
            tap_action:
              service: kodi.call_method
              action: call-service
              service_data:
                method: Input.Select
                entity_id: media_player.YOURID
          - icon: mdi:arrow-right-bold-circle
            type: button
            template: remote_button_round
            tap_action:
              service: kodi.call_method
              action: call-service
              service_data:
                method: Input.Right
                entity_id: media_player.YOURID
      - type: horizontal-stack
        cards:
          - icon: mdi:backburger
            type: button
            template: remote_button_round
            show_name: true
            name: Return
            size: 30%
            tap_action:
              service: kodi.call_method
              action: call-service
              service_data:
                method: Input.Back
                entity_id: media_player.YOURID
          - icon: mdi:arrow-down-bold-circle
            type: button
            template: remote_button_round
            hold_action:
              service: kodi.call_method
              action: call-service
              service_data:
                method: Input.Down
                entity_id: media_player.YOURID
              repeat: 100
            tap_action:
              service: kodi.call_method
              action: call-service
              service_data:
                method: Input.Down
                entity_id: media_player.YOURID
          - icon: mdi:chevron-double-down
            type: button
            template: remote_button_round
            hold_action:
              service: kodi.call_method
              action: call-service
              service_data:
                method: Input.ExecuteAction
                entity_id: media_player.YOURID
                action: pagedown
              repeat: 100
            tap_action:
              service: kodi.call_method
              action: call-service
              service_data:
                method: Input.ExecuteAction
                entity_id: media_player.YOURID
                action: pagedown
      - type: horizontal-stack
        cards:
          - icon: mdi:chevron-double-left
            type: button
            template: remote_button_round
            tap_action:
              service: kodi.call_method
              action: call-service
              service_data:
                method: Input.ExecuteAction
                entity_id: media_player.YOURID
                action: stepback
          - icon: mdi:pause
            type: button
            template: remote_button_round
            tap_action:
              service: kodi.call_method
              action: call-service
              service_data:
                method: Input.ExecuteAction
                action: playpause
                entity_id: media_player.YOURID
          - icon: mdi:chevron-double-right
            type: button
            template: remote_button_round
            tap_action:
              service: kodi.call_method
              action: call-service
              service_data:
                method: Input.ExecuteAction
                action: stepforward
                entity_id: media_player.YOURID
      - type: horizontal-stack
        cards:
          - icon: mdi:home
            type: button
            template: remote_button_round
            name: Home
            size: 30%
            show_name: true
            tap_action:
              service: kodi.call_method
              action: call-service
              service_data:
                method: Input.Home
                entity_id: media_player.YOURID
          - icon: mdi:stop
            type: button
            template: remote_button_round
            tap_action:
              service: kodi.call_method
              action: call-service
              service_data:
                method: Input.ExecuteAction
                entity_id: media_player.YOURID
                action: stop
          - icon: mdi:information-outline
            type: button
            template: remote_button_round
            name: Info
            size: 30%
            show_name: true
            tap_action:
              service: kodi.call_method
              action: call-service
              service_data:
                method: Input.Info
                entity_id: media_player.YOURID
          - icon: mdi:power
            entity: binary_sensor.kodi_wz_ping_binary_sensor
            show_icon: true
            show_name: false
            tap_action:
              service: script.toggle_kodi_box_power
              action: call-service
            type: button
            show_state: false
            state_color: true
You should have lovelace ui enabled and the mini-media-Player installed. Also there is probably need for a automation and a script.
The mini-media-player can be found here: https://github.com/kalkih/mini-media-player
The turn off automation runs the turn off script and sends a notify to Element Matrix Messenger. Be sure to choose your device and entity ID’s
alias: "Kodi WZ: turn off"
trigger:
  - platform: device
    device_id: YOURDEVICEID48390489032849024890
    domain: kodi
    entity_id: YOURENTITYID84938490384903893048
    type: turn_on
action:
  - service: script.kodi2_turn_off
    data: {}
  - service: notify.matrixkmj
    data:
      title: Kodi WZ Stopped
      message: Kodi WZ Stopped
The script to turn off the Kodi Instance looks like. Always, above and here, change to your entity_id:
sequence:
  - service: kodi.call_method
    target:
      entity_id: media_player.YOURID
    data:
      method: Application.Quit
  - service: notify.matrixkmj
    data:
      title: Kodi Box Stopped (S)
      message: Kodi Box Stopped (S)
Best add a binary sensor to make the power button change the color on power on and off. I use the custom icon color script to colorize the icons and other extras in the configuration.yaml:
# Loads default set of integrations. Do not remove.
default_config:

# we need custom UI for icon-color:
# https://github.com/Mariusthvdb/custom-ui
# https://github.com/Mariusthvdb/custom-ui/blob/master/EXAMPLES.md

# and lovelace for css attributes

# https://github.com/thomasloven/lovelace-card-mod
# https://community.home-assistant.io/t/change-the-color-of-the-icon-of-a-virtua
# for colors in dashboards and views

frontend:
  extra_module_url:
    - /local/card-mod.js
some sample settings for the sensors:
## color settings for different items!
  customize:
    sensor.apc1500:
      templates:
        icon_color: >
          if (state == 'ONLINE')  return 'green';
          else return 'red';
    sensor.apc3000:
      templates:
        icon_color: >
          if (state == 'ONLINE')  return 'green';
          else return 'red';
    binary_sensor.kodi_virt_ping_binary_sensor:
      templates:
        icon_color: >
          if (state == 'off')  return 'red';
          else return 'green';
    binary_sensor.kodi_wz_ping_binary_sensor:
      templates:
        icon_color: >
          if (state == 'off')  return 'red';
          else return 'green';
Finally the remote controls are done and its time to move on to the harder stuff using Zigbee2MQTT.
Adding Zigbee using Zigbee2MQTT with ConBee II
The story started kinda frustrating. I ordered a Aqara M2 Hub and a few temperature and motion detect sensors. Then it worked out, that the Aqara M2 Hub is unusable in a professional setup, nor does it work as controller for a Home Assistant Zigbee setup. They need their own App for setup and because I never would install a non Open-Source App on my mobile I tried to setup their app on:
- a virtual Androis-X86 9.0-r2 running on Proxmox with Network Interface into DMZ
- a virtual Android running on Waydroid
- a virtuel Android running on Android Studio Emulator
Non of this worked out, the app always crashed. So finally I had enough of their Zigbee Hub and the app requirement. This device not even has a web based UI for setup. They definitely want their app on your mobile, which is unacceptable. So I trashed the the Aqara M2 Hub, but not the sensors.
Finally I ordered a Conbee II USB Controller from Dresden Electronic and added this one via Spice USB pass through to the Proxmox VM running Home Assitant.
Because I already have my secure MQTT ( https://digitalbooks24.com/product/mosquitto-mqtt-broker-for-iot-internet-of-things-epub/ ) setup for Owntracks, APC UPS and others I decided to got with Zigbee2MQTT which makes it less dependent on proprietary solutions. They also have a huge compatibility list https://www.zigbee2mqtt.io/supported-devices/ .
I added a user on the LAN side Mosquitto Broker and allowed read/write of zigbee2mqtt and home assistant topics. The i added the add-on on Home Assistant.
with a base setting like
and a configuration like
Be sure to put your certs into /root/config/mqttcerts in advance. You can use the same certs as described in my MQTT boook. After the running sign shows green you can open the UI for configuration.
After the running sign shows green you can open the UI for configuration. The basic settings UI is kinda straight forward. I have not changed something and I have not enabled MQTT auto discovery nor in the MQTT setup and also not in the Zigbee2mqtt setup. I do not want the possibility that some misconfiguration can blow up my devices and entities without control by me. There is one setting on the main page letting us set the “permit to join” checkbox. Every time you want to join a device you should enable this and after joining is done, you really should not forget to disable it again.
Pairing (joining) is also pretty straight forward. Enable “permit to join” activate your device and press the pair button on it for a few seconds till the led starts flashing. I saw pretty fast, that with the Conbee II only i have not the needed range so there is need to build up a mesh network for Zigbee. After reading some time I got 3 IKEA E1746 Range extenters ( https://www.zigbee2mqtt.io/devices/E1746.html#ikea-e1746 ) and also took some of their E1603/E1702/E1708 Power Outlets ( https://www.zigbee2mqtt.io/devices/E1603_E1702_E1708.html#ikea-e1603%252Fe1702%252Fe1708) . With them some automation for power on and off should be easy. I paired the range extenders in advance, then the temperature and motion detection sensors. At the end I added the power outlets. You should pair the devices where they finally end, so they are paired with the correct range extender. This makes things more easy.
Every Model Name has a link to Zigbee2mqtt’s device description, showing the details of the device. You can find battery type, exposed values and controls there. If you click on the device by itself, you enter the info and settings for this device. About shows the device info, details the current values reported by it and settings let you change some of them. On the status tab you see the exposed values.
The power outlets can be switches and set also on the details page. Remember, we are still in the MQTT area!
Now, where the MQTT side part is done we need to add the devices to Home Assistant to have them available there. I know, it looks pretty easy to activate auto discovery. If you choose to enable it, you should have all the devices already in Home Assistant. I do not like things happen without control so I add each device manually to my system.
This is done pretty easy. You add each sensor and switch under the mqtt: integration in your configuration.yaml. This looks like this for 2 temp sensors and 2 power outlets:
mqtt:

  sensor:

# Aqara Sensor WZ via zigbee2mqtt

    - name: "WZ Temperatur"
      state_topic: zigbee2mqtt/0xYOURNUMBERS
      availability_topic: "zigbee2mqtt/bridge/state"
      unit_of_measurement: "°C"
      value_template: "{{ value_json.temperature }}"
      unique_id: "aqarawztemperature"
    - name: "WZ Luftfeuchtigkeit"
      state_topic: zigbee2mqtt/0xYOURNUMBERS
      availability_topic: "zigbee2mqtt/bridge/state"
      unit_of_measurement: "%"
      value_template: "{{ value_json.humidity }}"
      unique_id: "aqarawzhumidity"
    - name: "WZ Luftdruck"
      state_topic: zigbee2mqtt/0xYOURNUMBERS
      availability_topic: "zigbee2mqtt/bridge/state"
      unit_of_measurement: "hPa"
      value_template: "{{ value_json.pressure }}"
      unique_id: "aqarawzpressure"
    - name: "WZ Batterie"
      state_topic: zigbee2mqtt/0xYOURNUMBERS
      availability_topic: "zigbee2mqtt/bridge/state"
      icon: mdi:battery
      unit_of_measurement: "%"
      value_template: "{{ value_json.battery }}"
      unique_id: "aqarawzbattery"
    - name: "WZ Link Quality"
      state_topic: zigbee2mqtt/0xYOURNUMBERS
      availability_topic: "zigbee2mqtt/bridge/state"
      unit_of_measurement: ""
      value_template: "{{ value_json.linkquality }}"
      unique_id: "aqarawzlinkquality"
    - name: "WZ Power Outage"
      state_topic: zigbee2mqtt/0xYOURNUMBERS
      availability_topic: "zigbee2mqtt/bridge/state"
      unit_of_measurement: ""
      value_template: "{{ value_json.power_outage_count }}"
      unique_id: "aqarawzpoweroutagecount"
    - name: "WZ Voltage"
      state_topic: zigbee2mqtt/0xYOURNUMBERS
      availability_topic: "zigbee2mqtt/bridge/state"
      unit_of_measurement: ""
      value_template: "{{ value_json.voltage }}"
      unique_id: "aqarawzvoltage"

# Aqara Sensor im SR via zigbee2mqtt

    - name: "SR Temperatur"
      state_topic: zigbee2mqtt/0xYOURNUMBERS
      availability_topic: "zigbee2mqtt/bridge/state"
      unit_of_measurement: "°C"
      value_template: "{{ value_json.temperature }}"
      unique_id: "aqarasvtemperature"
    - name: "SR Luftfeuchtigkeit"
      state_topic: zigbee2mqtt/0xYOURNUMBERS
      availability_topic: "zigbee2mqtt/bridge/state"
      unit_of_measurement: "%"
      value_template: "{{ value_json.humidity }}"
      unique_id: "aqarasvhumidity"
    - name: "SR Luftdruck"
      state_topic: zigbee2mqtt/0xYOURNUMBERS
      availability_topic: "zigbee2mqtt/bridge/state"
      unit_of_measurement: "hPa"
      value_template: "{{ value_json.pressure }}"
      unique_id: "aqarasvpressure"
    - name: "SR Batterie"
      state_topic: zigbee2mqtt/0xYOURNUMBERS
      availability_topic: "zigbee2mqtt/bridge/state"
      icon: mdi:battery
      unit_of_measurement: "%"
      value_template: "{{ value_json.battery }}"
      unique_id: "aqarasvbattery"
    - name: "SR Link Quality"
      state_topic: zigbee2mqtt/0xYOURNUMBERS
      availability_topic: "zigbee2mqtt/bridge/state"
      unit_of_measurement: ""
      value_template: "{{ value_json.linkquality }}"
      unique_id: "aqarasvlinkquality"
    - name: "SR Power Outage"
      state_topic: zigbee2mqtt/0xYOURNUMBERS
      availability_topic: "zigbee2mqtt/bridge/state"
      unit_of_measurement: ""
      value_template: "{{ value_json.power_outage_count }}"
      unique_id: "aqarasvpoweroutagecount"
    - name: "SR Voltage"
      state_topic: zigbee2mqtt/0xYOURNUMBERS
      availability_topic: "zigbee2mqtt/bridge/state"
      unit_of_measurement: ""
      value_template: "{{ value_json.voltage }}"
      unique_id: "aqarasvvoltage"

# IKEA Strom Steckdose via zigbee2mqtt (Drucker)

  switch:
    - name: "Ikea Tradfri Outlet 1"
      state_topic: zigbee2mqtt/0xYOURNUMBERS
      availability_topic: "zigbee2mqtt/bridge/state"
      payload_off: "OFF"
      payload_on: "ON"
      value_template: "{{ value_json.state }}"
      command_topic: "zigbee2mqtt/0xYOURNUMBERS/set"
      unique_id: "ikeastrom0xYOURNUMBERS"
      state_on: "ON"
      state_off: "OFF"
      optimistic: false

# IKEA Strom Steckdose via zigbee2mqtt (WZ)

    - name: "Ikea Tradfri Outlet 2"
      state_topic: zigbee2mqtt/0xYOURNUMBERS
      availability_topic: "zigbee2mqtt/bridge/state"
      payload_off: "OFF"
      payload_on: "ON"
      value_template: "{{ value_json.state }}"
      command_topic: "zigbee2mqtt/0xYOURNUMBERS/set"
      unique_id: "ikeastrom0xYOURNUMBERS"
      state_on: "ON"
      state_off: "OFF"
      optimistic: false
Better restart Home Assistant using Developer Tools yaml tab AFTER checking your configuration on this tab!
If all is fine you should see all entities in the entities list! If all is fine you should see all entities in the entities list! You now can display the values, create automation, or switch the power outlets. I add you a few images how this can look like:


Hopefully this gives you inspiration for extending your own setup. Feel free to join my Matrix room if you have any questions. If there is time I answer questions there. And only there.
Links
- Mini Media Player https://github.com/kalkih/mini-media-player
- Custom-UI https://github.com/Mariusthvdb/custom-ui
- Lovelace Card-Mod https://github.com/thomasloven/lovelace-card-mod
- Zigbee2mqtt device list https://www.zigbee2mqtt.io/supported-devices/
Commercial customers
CTS IT Solutions founded by me offers commercial customers perfect and well-tested IT solutions! We would be happy to advise you on all questions relating to IT!
Community discussion: Join my public room in the Matrix
If you like this blog entry feel free to join my public room by entering /join #kmj:matrix.ctseuro.com anywhere in the Element Messenger ( https://element.io ) box to send a message! Or follow this Link: https://matrix.to/#/#kmj:matrix.ctseuro.com
Help or answering questions ONLY in this room! Commercial support is available in English or German at https://ctssupport.at
Greetings,
Karl
Author: Karl Joch. Originally published here